National Geographic Photo of the Day

Showing posts with label video conversion. Show all posts

Saturday, July 25, 2009

Guide: Getting a WMV-HD video ready for the PS3


In my last post, I’d detailed how you could demux and remux a video from an MKV container into a PS3-compatible format.


This time around I’ll be describing the same operation but with the input file being a high definition WMV having a VC-1 codec video and WMA Pro Audio. Inevitably most such HD WMV movies come with a 5.1 WMA Pro audio track and a 2.0 WMA track as well. The sad thing is that the console will NOT read the WMA Pro 5.1.


Applications Required:

  • Windows Media Encoder (freely downloadable from Microsoft)
  • Boilsoft Video Splitter (this one isn’t a free utility, so use it or some other free tool capable of splitting WMV-HD. If you do find a free alternative, please tell me via the comments)

What we’re gonna do here is basically create a WMV-file with the VC-1 video and ONLY the 2.0 audio track.


First download and install Windows Media Encoder. A quick google search will get you the link.


Once Windows Media Encoder is installed, you’ll see there’s “Windows Media Stream Editor” under Start--> Windows Media --> Utilities. Click on that. Now go to Add Source, and choose your WMV file. Once ‘added’ to the input list, expand all the + boxes until you have something similar to the following picture.


Now, you’ll see two “audiences” (or more if you have more audio tracks) and each one will have a video and audio subcategory underneath which will further expand to reveal the bitrates and the language. Leave all the checkboxes unchecked initially. The audio track that says 384 kbps will most likely be the 5.1 audio. The video tracks will always be in the mbps bitrate range. So check the box next to the other audio track (probably 192kbps or 333 kbps), and check the box to the video track under the same audience as the audio track you just selected.


Click “Add” and the audience you selected should appear under output audiences. Next click “create file” and give the output a name. Hit “Start” and your output should be ready soon. The video from these files will play well in VLC, but then the audio might return an error. There’s no need to be alarmed, just continue.


This file should be playable on a PS3 as such, but there exists a problem when the file is larger than 4gb. As explained earlier, only files smaller than the above stated size can fit on FAT formatted media. Anything more will need NTFS, which again is not supported by the PS3. So you’ll need to split the file.


Whereas tsMuxer has an inbuilt “Split option”, that is absent in Windows Media Encoder. So we need to use Boilsoft Video Splitter to do that task. Open up Boilsoft Video Splitter, and click Open and load your newly created WMV. Use the split into option and type in the number of pieces you want. Once the size of each part is below 4gb, click the split button, and it should give you two WMV files (or how many ever parts you chose).


Finally, copy them over to the PS3 and enjoy your HD WMV videos.


Friday, July 24, 2009

Guide: Demuxing and Remuxing MKV for the PS3

I had purchased a 160gb PS3 a month back, not just for gaming, but for its media-related features as well. Though I do stream (via wifi or ethernet) a bit to the Playstation 3, I tend to load its hard drive with High Definition (720p and 1080p) videos which, initially, were in MKV and WMV-HD formats.


Now the PS3 will not play files in the MKV Container as is. So don't try putting them directly on the HDD. I'd like to share my experience with muxing and demuxing these files and WMVs for the benefit of others in the similar situation.

First, MKVs.

As an example, I will be using an MKV with x264 video and DTS 5.1 audio. Transcoding to a different codec might make this file more compatible with the PS3, but the problem is any sort of transcoding operation WILL decrease video quality. So all we're aiming to do is demux and remux, and convert the audio alone. And I'm not going to deal with subtitles either.
Applications required:
  • MKVToolnix (MKV-extract GUI in particular)
  • WinFF
  • TsMuxer GUI


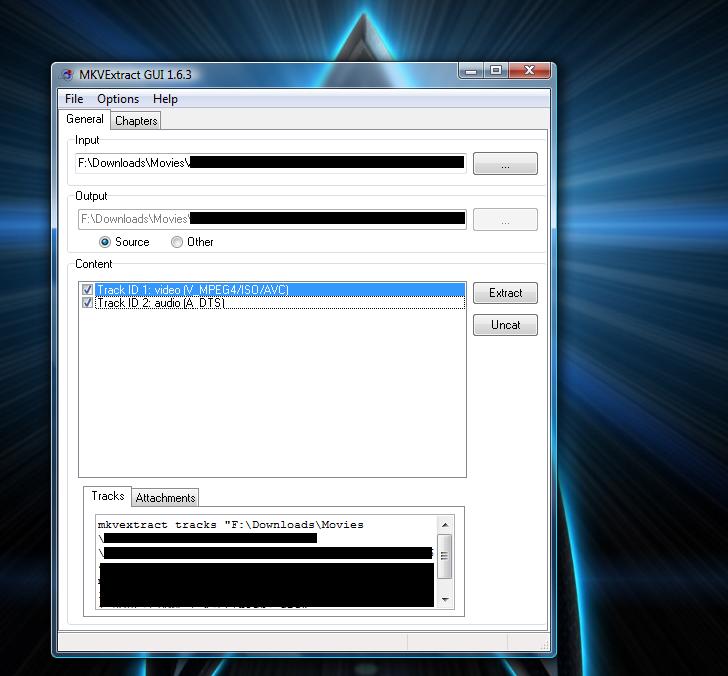
Load up your MKV file in MKV Extract GUI. The list of tracks contained in the MKV is displayed. Here select just the MPEG4/ISO/AVC and DTS tracks (check the boxes) and hit extract. The destination directory will contain the output in the form of a .264 and .dts file. The .dts file is the audio portion and I downmix that to 2.0 AC3 using WinFF. Open up WinFF and drag and drop the .dts file into it. Select Audio from the drop down menu and AC3 384kbps from the subcategory. The end result after you convert this will be a .ac3 file.

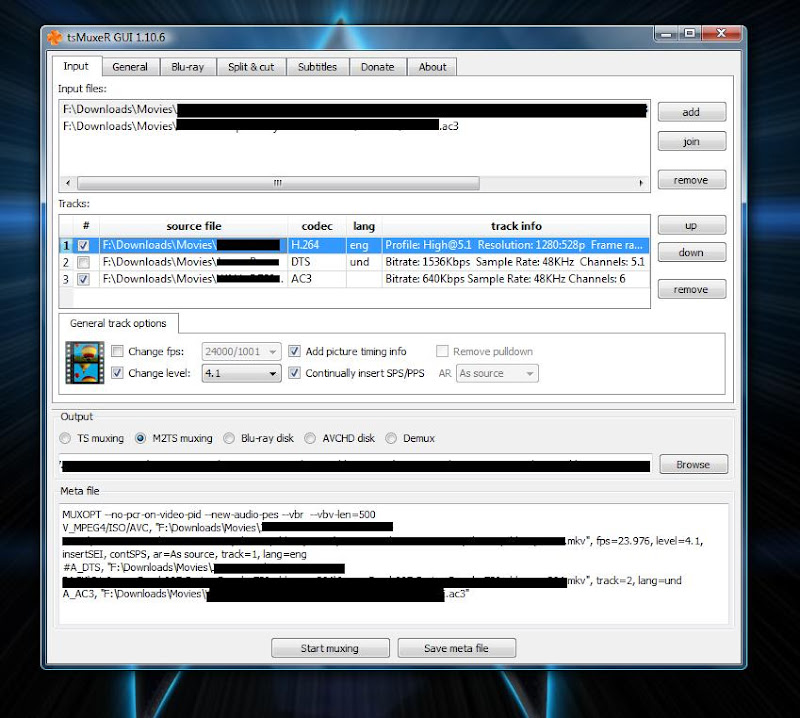
We now have all we need to make the m2ts output that will play on the PS3. Start up TsMuxer GUI. Drag and drop both the AC3 and the X264 parts into TsMuxer. There is one alternative way to do this too, without extracting the video (x264) from the mkv. TsMuxer can directly read the MKV and it will list the DTS track as well as the video track. Leave the video selected, uncheck the DTS audio and add the AC3 audio to the list of inputs. Check the box next to the AC3 track too.


Click on the track that says H.264. If the number next to "Change level" is greater than 4.1, enable the option "Change level" and choose 4.1 from the drop down menu. Else it won't play on the console. Choose "M2TS muxing" as the output option. Also, if your video is greater than 4gb, you won't be able to put it on a FAT32 formatted drive (whether it be a pen drive or an external HDD). And the PS3 cannot read NTFS formatted media.

So use the split and cut tab to choose the "Split by size" option and enter a value less than 4gb. Then go back to the Input tab and hit start muxing. Your output file will be a .m2ts file (or two or three of them if you had a large video to begin with). Copy these to the FAT32 formatted media, and enjoy HD awesomeness on your LCD or Plasma via the black box (assuming you have a HD ready or Full HD screen that is).

I'll post on how to rectify the WMV-HD video for playback on the PS3 in another post.

Till then, I hope this helps. And do note that the tools mentioned are all freely downloadable.


UPDATE: Please note that I'm downmixing 5.1 DTS to AC3 2.0 in the above example. However if you wish to convert the DTS 5.1 to AC3 5.1, just Popcorn MKV AudioConverter (links to tutorial and download), its a free utility. Then use the converted AC3 5.1 audio equipped MKV directly in TsMuxer.

The reason I'm not directly using 5.1 DTS is because the latest version of TsMuxer gives me an output with only video when I use the MKV directly with DTS. Might just be some problem with my computer and TsMuxer not getting along well but thought I'd suggest an alternate.